

I have damaged my shower and have a small chip in the fibreglass. What can I do to repair it?
Use Polyester Gelcoat with Wax in styrene added to cure the gel without being tacky to repair the shower. Then Wet & dry with fine paper 1200 grit and polish to finish it off.
Can I collect my Shower ex works?
Yes you can. If you live in SE Queensland and you have a suitable vehicle or trailer you are welcome to collect your shower from the Manufacturer when it has been completed. We will provide the address and advise when it is ready to collect.
Please note showers are best transported lying down to avoid the wind unless they are in an enclosed vehicle. If you are going to on-freight it with your transport make sure you ask for it to be packaged for transport to avoid any damage.
Is the shower base strong enough to support a large person ?
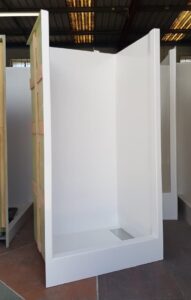
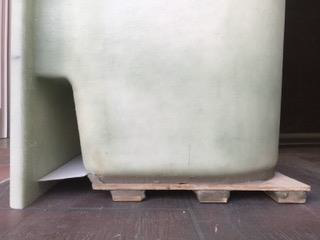
DIY showers are built to last. The standard height model are supported by structural ply bonded to the shower itself (see pic below).
The raised base showers have between 11 and 14 legs installed to support the shower base and each leg is rated to 160 kgs. In addition the base is constructed from 12mm structural ply base bonded to the shower with 100mm x 17mm ply strips bonded & screwed to the base to support the legs – please see pics below.
What is the difference between a Standard Base and a Raised Base Shower ?

The Standard base models are recommended for installs where the cubicle will be placed on a caravan/ RV floor or a timber floor where you have underfloor access or new build situations where the waste can be set up in the slab when it is poured.
The Raised Base models are an option for people installing their cubicle on an existing solid floor such as concrete or an RV floor you cannot go underneath so you will need to install above ground plumbing for the waste.
By choosing the Raised Base Kit with your DIY shower you have the option of redirecting the waste outlet under the shower without the need for the expensive time-consuming and messy task of cutting your concrete slab. The waste pipe can be redirected to an existing waste in floor, or through an adjoining wall to another waste point/pipe or a Saniflo system.
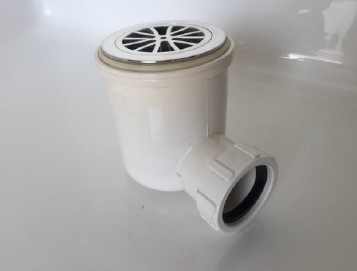
For most DIY showers you can choose either the Flexi waste or the Micro trap depending on how much ceiling height you have available.The Flexi waste adds 100-110 mm and the Microtrap adds 150-180 mm to the height of the complete cubicle. For Shower G the waste recess design means only the Flexi waste raided bed option is available for this Shower.

Where are the showers made?
DIY showers are manufactured in SE Queensland by a dedicated family business. The showers are made to a very high quality from one piece fibre-glass molds – providing a very strong cubicle with a high gloss quality gel coat finish. We are confident you will be very pleased with the quality of this product.
How do you freight the Shower Cubicles and what does it cost?
For local customers in SE Queensland, the cubicles may be delivered direct to your address and there is no need to wrap and pack the cubicle. Please provide your ship to address if you would like a freight quote.
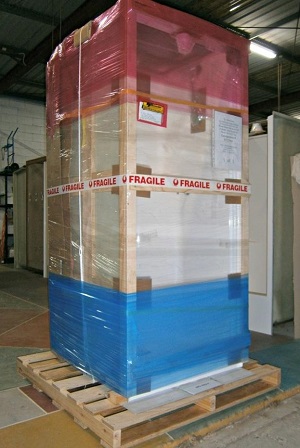
For other customers we need to put the shower on a pallet and thoroughly protect it with bubble wrap to prevent any damage in transit. For this there is a fee of $99 plus gst.
Our preferred freight company is Land Transport so we can then deliver the shower to any Land Transport depot in Eastern Australia, from where you can collect it at your convenience.
For customers in WA, NT or Tasmania we can ship it to a Brisbane depot and you can arrange to on-freight it to your local depot.
Please click here to select your nearest Land Transport depot and include it in the Notes on your Order Form.
This is the most cost effective means of transport and we regularly deliver to the Derrimut depot in Melbourne and Erskine Park depot in Sydney. When you order please advise the depot most convenient for you to collect from.
Can I cut the top of the shower cubicle to reduce the height?
The DIY showers are a high quality one piece fibre-glass product made from a mold with a fixed size. At the top of the cubicle is a ‘return’ so you can seal the top against the walls on three sides. When you install the cubicle you will need to pack out the plywood spacers on the shower sides to attach each side firmly to the walls.
The manufacturer recommends installing the shower cubicle as manufactured for the best performance. However, if you wish to cut the top off to fit into your project space here are a few pointers:
- You will need to ensure the sides are adequately attached to the 3 internal walls especially near the top to maintain the structural rigidity of the cubicle. This can be done with plywood packers and construction adhesive to restore the strength at the top of the cubicle
- You will also need to seal the top of the cubicle to the roof of your vehicle to prevent any water from going behind the shower walls. This will also improve the strengthening of the top of the cubicle
Does the shower come with any holes or fittings?
All the DIY Showers are supplied as a bare cubicle with no fittings and no holes are drilled in the fibre-glass (except a pilot hole through the waste to secure it to the pallet).
This is because all our customers have different applications and you can plumb it in to suit your specific project and locate your mixer valve and shower rail exactly where you want it. This way you can drill the holes the right size and precisely where you want them.
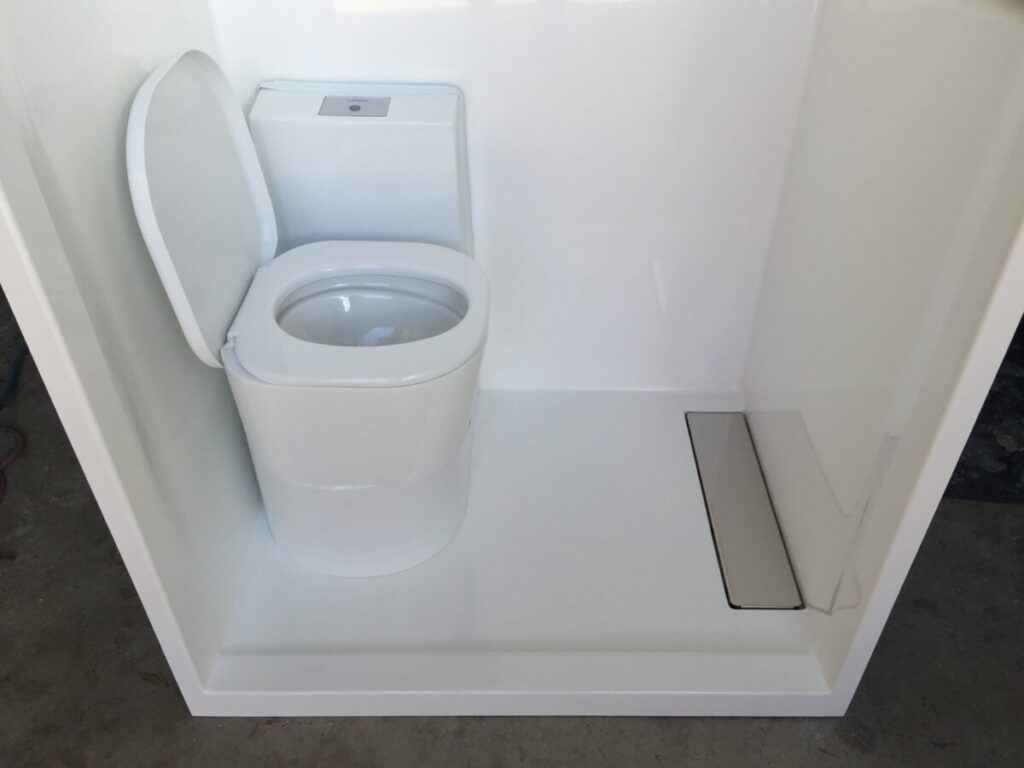
Which DIY Shower is best if I want to install a toilet?
The latest designs of DIY showers includes the Showers E, F and H.
These shower cubicles have the following features
- a tighter radius in the corners (10mm)
- a slot drain with a stainless steel cover plate on the right hand side
- leaving space on the left hand side for a toilet
Shower H is the ONLY shower that has been specifically designed to accomodate a toilet since
- it has a slope of 10mm on the left hand side of the floor and a slope of another 20mm on the right hand side of the floor – so the water naturally runs left to right – away from the toilet area.
- it has a different core material adding more strength in the rear wall on the Left Hand side where you will need to cut the hole for the cassette to be removed. Note – this shower is designed to access the cassette in this location only (not through the LHS wall).
NOTE – Some customers have also installed compact toilets in Shower F which is fine but you will need to add the strength around the cassette access area in the rear wall as it was not originally designed for this purpose.
Which cassette toilet is best to install inside a shower?
We recommend customers understand the pros and cons of the different toilets so they make an informed choice – there are not many models to choose from in Australia.
- Most cassette toilets are not designed for installing in wet areas – this applies to all models expect the Thetford bench toilet. Only the Thetford C402C Bench Toilet has been designed with a sloping top to keep the shower water out of the bowl and no hard to reach areas to be cleaned. And since it is designed to fit between 2 vertical walls the 12 volt electrics are well protected. If installing one of these toilets in a DIY shower you will need to consider:
- The vertical walls of our showers are not exactly perpendicular to the floor but have a slight angle iun the mold so care will need to be taken when sealing the toilet in place
- Installing an end panel for the end you are NOT accessing the cassette out of. A panel of high density pvc board would be ideal for this purpose. See the rear and side images of the Thetford 402C toilet here.
- When you cut the hole in the shower cubicle for access to the cassette you need to make sure the shower wall around the hole is particularly well supported where it is attached to the van wall and it is well sealed
- Other toilets such as the Dometic Saneo with ceramic bowl , the Thetford C263CS with the ceramic bowl or the lighter and more compact Thetford C223CS with the plastic bowl are designed to be mounted on the floor and secured to one vertical wall only. If installing one of these toilets in a DIY shower you will need to consider:
- The cassette will fill very quickly if any shower water gets into it – so you will need to cover the toilet bowl to prevent this – one way is to create a cover sheet on a roll from shower curtain material so that you can cover the toilet entirely whilst the shower is in use and keep the toilet 100% dry
- When you cut the hole in the shower cubicle for access to the cassette you need to make sure the shower wall around the hole is particularly well supported where it is attached to the van wall and it is well sealed
- The vertical walls of our showers are not perpendicular to the floor but have a slight angle so care will need to be taken when sealing the toilet in place
- The toilet has a 12 volt supply to operate the flush system and so must be 100% watertight and well sealed from water ingress
- Ability to clean the shower around the toilet area
Our full range of cassette toilets can be found here. Whilst we rarely see the finished projects we can confirm our customers have purchased both Dometic Saneo CS, Thetford C223CS and Thetford C402 toilets to go into DIY Shower H.
And don’t forget the Access Door to empty the cassette if you need one – most cassette toilets will need a Thetford #3 Service Door so please order at the same time.
What size shower do I need if I am installing a toilet?
Customers vary in their willingness to compromise space and comfort. The DIY Shower H is a new cubicle design developed for customers wanting to include a toilet in projects like caravans and horse floats. Or DIY Shower F has also been used by customers intending to install a toilet inside.
If I buy a Glide-away Door with the Shower Cubicle will I save money?
Yes you will – we will ship the shower door inside the Cubicle so there will be no freight cost for the Glide-away door.
What is the best way to unpack the shower when I receive it?
What you will need :-
(1) Stanley Knife / Box Cutter
(2) Battery Operated Screw Gun with Phillips Head Bit
(3) Protective Gloves
(4) Two able bodied people to lift shower
(5) Phillips head screw driver and Shifting Spanner
Check for damage to packaging on delivery/pickup.
Start by cutting away the plastic shrink wrap, being careful not to damage the shower cubicle. Cut any rope that is tied to the pallet. Timber/ply is sometimes used at the top or front of the shower for rigidity so check if there is any chance of falling materials while unwrapping.
Remove any cardboard from around the shower.
Check around the base of the shower for timber blocks/aluminium angles and screws through the timber base as well as the waste outlet and remove with screw gun. If this is done outside be careful of strong winds. A second person can hold the shower while this is done.
The shower should be ready to remove from the pallet; a hand trolley can be used to move the shower. Care should be taken over rough or uneven ground.
What does a DIY Shower weigh?
A bare shower cubicle will weigh approx 35-45 kgs depending on the specific model. They are made from a one-piece fibre-glass mold and are very robust. If you are looking at booking your own freight – once the shower is packed and wrapped on a pallet it will weigh an extra 20-25 kgs.
How should I clean and care for my shower?
Here are some key tips from the manufacturer
- Never use abrasive pads/scourers or cleaners on the shower cubicle as this will scratch the surface
- Most non-abrasive shower cleaning products can be used on the gelcoat surface to clean and sanitise the shower cubicle
- Use a soft cloth or sponge
- For a non-chemical option – spray with white vinegar and leave for half an hour before wiping off with a wet cloth
- For scummy areas baking soda can be used to gently clean the surface
- Rinse the shower with water to remove any residue left on the surface
Please note: This information in our DIY Guides is here to help customers choose the best components for their projects. It is the customers responsibility to ensure all conditions of a product’s warranty are followed and DIY Caravans cannot be held responsible for any consequences if this is not the case.